
อัพโหลดเสร็จให้ลองกด Reset สักครั้งก่อน
จากนั้นให้ลองเอา tag แตะดูจะเห็น UID ของ tag นั้นๆ ซึ่งจะไม่ซ้ำกัน
ตัวอย่างการอ่าน NFC
ในการทำให้โมดูลอยู่ในโหมด NFC ให้เราใช้การต่อแบบ I2C ซึ่งทำให้ต้องปรับสวิตซ์ที่ตัวโมดูลเป็นตำแหน่งดังรูป

วิธีการต่อ PN532 กับ Arduino uno / arduino nano เพื่ออ่าน/เขียน tag NFC
PN532 NFC RFID MODULE ARDUINO UNO
VCC 5 V
GND GND
SDA A4
SCL A5
ตัวอย่าง Code PN532 กับ Arduino ผ่านการสื่อสารแบบ I2C เพื่อเขียน tag ใหม่
| /** |
| * www.arduinona.com |
| * ทดสอบเขียน tag ด้วย Arduino + PN532 |
| * ให้อัพโหลดโค้ดนี้แล้วเอา tag มาแตะที่โมดูล |
| * จากนั้นเปิดโหมด NFC บนมือถือ แล้วเอา tag ไปแตะที่มือถือ |
| * |
| */ |
| #include <Wire.h> |
| #include <PN532_I2C.h> |
| #include <PN532.h> |
| #include <NfcAdapter.h> |
| PN532_I2C pn532_i2c(Wire); |
| NfcAdapter nfc = NfcAdapter(pn532_i2c); |
| void setup() { |
| Serial.begin(115200); |
| Serial.println("NDEF Writer"); |
| nfc.begin(); |
| } |
| void loop() { |
| Serial.println("\nPlace a formatted Mifare Classic NFC tag on the reader."); |
| if (nfc.tagPresent()) { |
| NdefMessage message = NdefMessage(); |
| message.addUriRecord("http://www.arduinona.com"); |
| bool success = nfc.write(message); |
| if (success) { |
| Serial.println("Success. Try reading this tag with your phone."); |
| } else { |
| Serial.println("Write failed."); |
| } |
| } |
| delay(5000); |
| } |
เมื่ออัพโหลดโปรแกรมแล้ว ให้เปิด Serial monitor ขึ้นมา จะเห็นข้อความดังรูป

ให้เราเอา tag ไปแตะไว้ที่โมดูล จะเห็นข้อความดังรูป
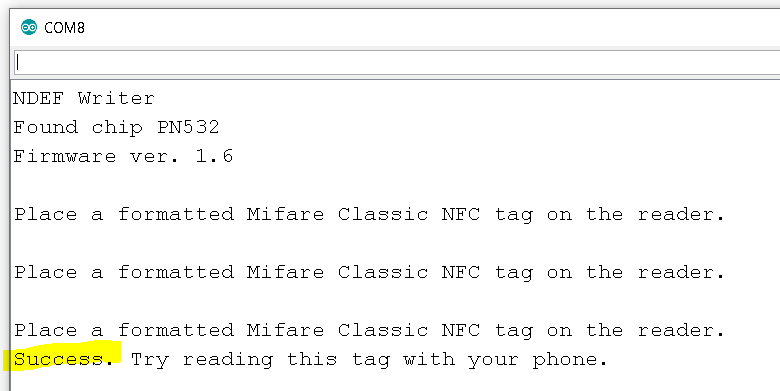
ให้ลองเอามือถือที่รองรับ NFC และเปิดใช้งาน NFC ไปลองแตะที่ tag ดูจะเห็นว่าสามารถอ่านข้อมูลที่เราเขียนไว้ได้เลย
ตัวอย่าง Code PN532 กับ Arduino ผ่านการสื่อสารแบบ I2C เพื่ออ่านค่าที่เก็บไว้ใน tag
| /** |
| * www.arduinona.com |
| * ตัวอย่างการอ่าน tag NFC |
| */ |
| #include <Wire.h> |
| #include <PN532_I2C.h> |
| #include <PN532.h> |
| #include <NfcAdapter.h> |
| PN532_I2C pn532_i2c(Wire); |
| NfcAdapter nfc = NfcAdapter(pn532_i2c); |
| /* Uno's A4 to SDA & A5 to SCL */ |
| void setup(void) { |
| Serial.begin(115200); |
| Serial.println("NDEF Reader"); |
| nfc.begin(); |
| } |
| void loop(void) { |
| Serial.println("\nScan a NFC tag\n"); |
| if (nfc.tagPresent()) |
| { |
| NfcTag tag = nfc.read(); |
| tag.print(); |
| } |
| delay(1000); |
| } |
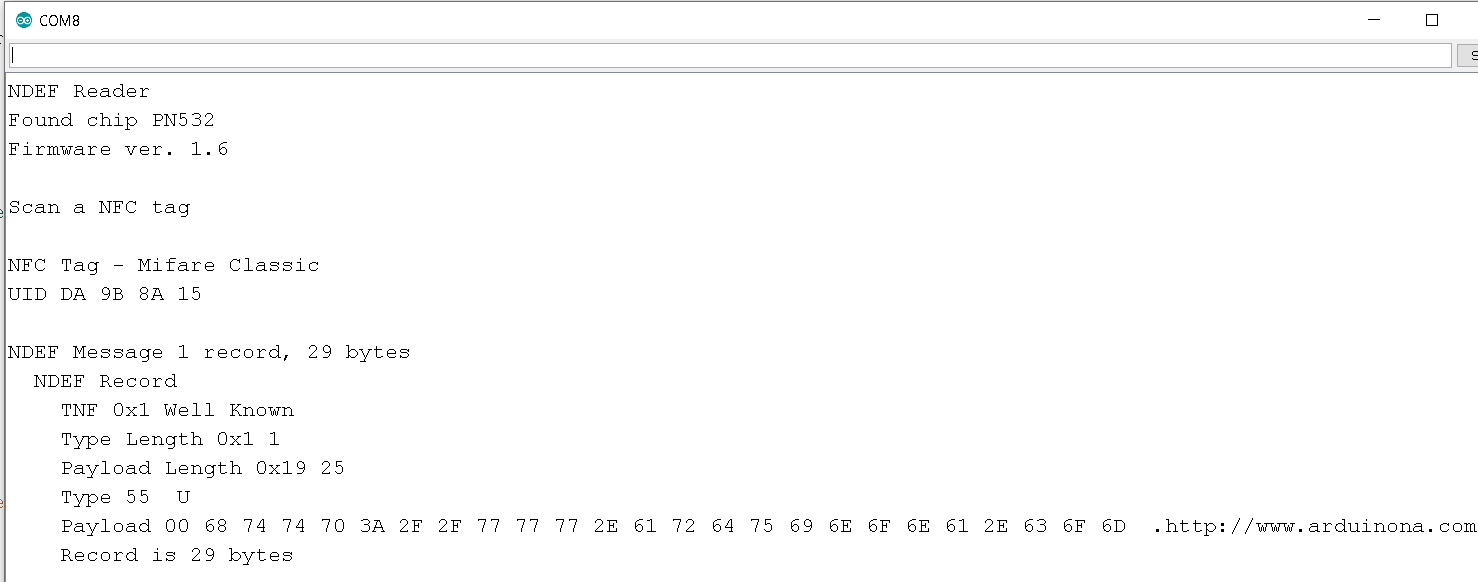
เมื่ออัพโหลดโค้ดแล้วเปิด Serial monitor แล้วลองแตะ tag ดูจะเห็นข้อมูลที่เราได้เขียนไว้ครับ
เลี้ยงกาแฟผมสักแก้ว : https://ko-fi.com/modulemore